AFC GRILLED : Chef Sean Connolly

An evening of good food.

Lap Cheong Watermelon Bites

An asian take on watermelon bites!

Baked Fish with Kiwi in Sweet and Sour Sauce

Add a twist to sweet and sour fish!

Semperit Pandan Cookies

Cute cookies for the festive season!

Showing posts with label Desserts. Show all posts

Monday, April 11, 2016

Sweet Mung Bean Barley Soup (Slow-Cooker)

24 comments

Soft-spoken and modest, Chan doesn't know it but she was a key figure on my foray into sweet soups during my younger days. She's a friend whom you can share every imperfect bit about yourself; that friend who accepts you as you are. I was reminded of her when I made this. We lost touch when I moved to the city.

Sweet Mung Bean Barley Soup (Slow-Cooker)

It started with my first attempt at making mung bean soup. I told Chan about my upcoming kitchen adventure. Her enthusiasm soared and she started sharing with me various sweet soups she had tried before, from wheat porridge to red bean. I called her a couple of times about the ingredients I would need and the hows. Once I got the basics down to a pat, I began working with various ingredients and flavours to suit my moods and palate. After that, I was well on my way. Many different sweet soups have been made since!

This mung bean soup is sweetened with candied winter melon. Brown sugar, jaggery, honey rock sugar or just plain sugar is a great alternative. That's the magic of homecooking. It's about being free and easy, tossing this and that into the pot with a happy song in the heart. 

This sweet soup is an effortless dessert that I love making because it's basically about gathering the ingredients and leaving it to cook for a long time.  

Sweet Mung Bean Barley Soup (Slow-Cooker)
Ingredients:
- 150g sweet potatoes (cut into medium cubes)
- 100g mung beans (wash thoroughly)
- 100g barley (wash thoroughly)
- 100g candied winter melon strips (or to taste)
- 1 knotted pandan leaf
- 6 cups hot water

How-to:
1) Place all the ingredients into a slow-cooker. Add the water. Stir the ingredients.
2) Cook on high until the beans are tender. It took 3 hours for me.
Add more water if a soupier version is preferred.

Optional: Serve with a splash of coconut milk.


4 main ingredients: Candied winter melon, mung bean, barley, sweet potatoes!
Cook until tender.

Sweet Mung Bean Barley Soup

Best eaten warm!

It's good as a chilled dessert too. For this, I would usually add more water as the soup turns out thicker when chilled and I would add more candied winter melon too, not just to match the additional water, but because I find the sweetness a little flat.


Read more...

Thursday, February 4, 2016

Steamed Red Anjou Pear In Chrysanthemum Tea

12 comments

Red Anjou pears are my recent obsession. Weeks ago, I used it in a foil-baked chicken recipe. I steamed the pears this time. Since I was tasked to work with chrysanthemums in a Little Thumbs Up event, I went with that to give my pear dessert a floral aroma.

Steamed Red Anjou Pear In Chrysanthemum Tea

The flavour turned out beautifully. It was smooth, with a well-rounded sweetness that made me wish I had added more liquid so that there was more to savour. But then again, more isn't always better! The sauce would have been diluted.

Steamed Red Anjou Pear In Chrysanthemum Tea

Ingredients:
- 2 tbsp dried Chrysanthemums (rinsed)
- 1 red Anjou pear (halved, seeds removed and sliced ¾ of the way as shown in the pics)
- 1 tbsp honey

How-to:

1) Steep dried Chrysanthemums in 1½ cup hot water for about 10 minutes)
2) Pre-heat steamer.
3) Place halved pear pieces onto a steaming plate.
4) Pour steeped Chrysanthemum tea through a fine-mesh strainer over the pears.
5) Drizzle honey over.
6) Steam for 15 minutes.

1) Dried Chrysanthemums being steeped in hot water.
2) Remove seeds from pear.
3) Place sliced pear onto a steaming plate. Pour Chrysanthemum tea and drizzle honey over.
4) Steam for 15 minutes.

Heavenly Steamed Red Anjou Pear In Chrysanthemum Tea

Enjoy!


With that, Happy Chinese New Year from all of us at Sweet Home-Chefs.
We wish you Gong Xi Fa Cai!

~~~~~~~~~~~~~~~~~~~~~~~~~~~~~~~~~~~~~~~


This post is linked to Little Thumbs Up - Feb 2016 which is organised by Zoe from Bake for Happy Kids and Doreen from My Little Favourite DIY, and hosted by Sweet Home-Chefs.

Read more...

Monday, February 1, 2016

Butterfly Pea Agar-Agar

18 comments

Butterfly Pea Flowers (clitoria ternatea) aka Blue Pea Flowers have long been used in South East Asian cuisine. The flowers are widely utilised as a colouring agent for rice in Nasi Kerabu and Pulut Tai Tai (a glutinous rice cake) in Malaysia. It is fried in batter in Thai and Burmese cooking. The petals are also eaten raw in salads.

I decided to go with a beautiful agar-agar jelly for these freshly picked flowers.

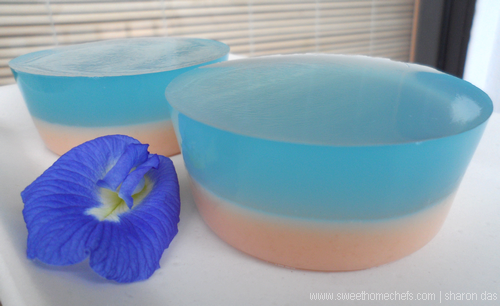
Pretty Butterfly Pea Agar-Agar

These lovelies are really easy to make. The basics - use two packets of agar-agar powder (one brown, one clear). Cook according to packet instructions. Colour one using blue pea flowers. Cook the brown one with coconut milk. Voila! Present with fresh edible butterfly pea flowers.

Butterfly pea flowers are mildly sweet; I ate only the petals, pinching away the greens at the bottom.

Fifteen of these flowers gave me a light shade of blue - I was worried that it wouldn't stand out, but it did! The colour became more obvious after it firmed on top of the brown agar-agar. I was so pleased with the results. It was a pretty combination.

Here's the detailed recipe.

Butterfly Pea Agar-Agar


Brown Colour Portion
Ingredients:
- 10g brown agar-agar powder
- ½ cup soft brown sugar
- ½ cup coconut milk
- 3 cups water

How-to:
1) Mix agar-agar powder with brown sugar.
2) Add water into a deep pan.
3) Stir the mixed agar-agar mixture and coconut milk in, and switch the heat on.
4) Keep stirring until it comes to a low boil and don't stop stirring until the mixture is well combined (sugar dissolved). Then, switch the heat off.
5) Let it cool a little before pouring the agar-agar liquids into moulds, at half full each.
I used silicone cup moulds for some. It was very easy for me to remove the agar-agar here. The balance was poured into a square tin.
6) Then, leave aside to let it set whist you work on the next batch. (I left it to chill in the fridge as it wasn't steaming hot anymore.)

Blue Colour Portion

Ingredients:
- 10g plain/clear agar-agar powder
- ¾ cup fine white sugar
- 15 fresh butterfly pea flowers
- 4 cups water (follow packet instructions)

How-to:
1) Mix agar-agar powder with sugar.
2) Add water into a deep pan.
3) Stir in the mixed agar-agar mixture. Place the fresh flowers into the pan. Switch the heat on.
4) Keep stirring until it comes to a low boil and use your spatula to press on the flowers to extract the blue. Don't stop stirring until the mixture is well combined (sugar dissolved). Then, switch the heat off.


Finally, take the brown coconut agar-agar out from the fridge. It should have settled into a jelly-like texture by now. Optional: Use a fork and gently poke some holes on top, or grate the set agar-agar a little. This is to help the second layer stick to the first layer. 

Pour the butterfly pea colour portion over the brown one, thereby filling the mould. Chill until firm!

Top: Boiling the brown agar-agar powder with coconut milk and brown sugar
Middle: Boiling the clear agar-agar powder with sugar and butterfly pea flowers
Bottom: Leaving the agar-agar to set into a jelly-like texture

Butterfly Pea Agar-Agar

Butterfly Pea Agar-Agar Halved

Enjoy! My family gave it a big thumbs up!


~~~~~~~~~~~~~~~~~~~~~~~~~~~~~~

This post is linked to Little Thumbs Up - Feb 2016 which is organised by Zoe from Bake for Happy Kids and Doreen from My Little Favourite DIY, and hosted by Sweet Home-Chefs.
Read more...

Wednesday, April 16, 2014

Mung Bean With Honey And Papaya

6 comments
One of the girls in our cooking group said,"Let's do dessert this weekend!". Several of us responded with an enthusiastic yes!

A packet of mung beans was pulled out of the kitchen cabinet. I knew what I wanted to do, a sweet soup dessert with sago pearls ... like always. "How predictable!" the thought crept in and it dug deep.

I was egged by it into doing something I never tried before - and that is how this easy treat really came about, a need to break out of the norm.

SAM_8461
Mung Bean Honey Dessert with Papaya

This is so simple to make that you don't need exact measurements. Boil however much you want, add more fruits if you prefer, flavour with as much honey as you like.

Ingredients:
- Mung beans (boil in water until soft. keep the water aside.)
- Honey
- Papaya or fruit of choice

How-to:

Boil mung beans in water until soft. Keep the water aside.

Pour softened mung beans into the blender with some of the mung bean water. Blend. Check if this is the consistency you want. If it is too thick, add more water and continue blending. Do this until you have a nice smooth puree - not too watery, not too thick. 

Use a melon baller to scoop out balls from the papaya. 

To serve, pour the mung bean puree into a bowl. Place the papaya ball on top and drizzle with honey. Best eaten warm.


SAM_8449
Softened Mung Beans - Boiled in water for about 40 minutes

SAM_8450
Blended Mung Bean

Mung Bean Honey Dessert

Read more...

Wednesday, February 26, 2014

The No-Bake Papaya-Banana Pie

10 comments

What's great about this pie? It's healthy! This is probably the wisest decision I've made after all that festive food.

I'm not excited to see another pineapple tart, love letter or fortune cookie. Maybe just the fortune cookie ~ only because it includes a small piece of folded paper with inspiring messages. That always makes me smile. It's a good present to open.


The No-Bake Papaya-Banana Pie

The individual who came out with this recipe is to be admired. This is brilliantly easy to prepare. The papaya-banana topping has a custard-like texture. It's very yummy to tuck into.

Recipe adapted from here (Cooking At The Pacific Outpost).

Portion for one.
You will need a 4
½ inch x ¾ inch pie tin with removable base)
Ingredients:

(A) Nutty Pie Base
- ¼ cup shelled almonds
- ¼ cup ground hazelnut
- 2 partially rehydrated dried fig (chopped)
- A drizzle
of honey

(B) Fruit Topping
- 1 medium ripe banana (sliced)
- 1½ cup ripe papaya (cubed)
- Juice of 1 calamondin

How-to:

1) Blend ingredients A together. Press this down into the pie tin and along the sides to (see picture below).

2) Blend ingredients B together. Pour this onto the nutty pie base.

3) Freeze for a couple of hours or less, depending how cold your fridge is set (don't let it turn icy). Texture should be jelly-like and easy to cut through.

4) Slide the pie out of the tin and serve as is. Best eaten immediately, and alone (maybe it's just me).

1) Blend nuts together
2) Make pie base
3) Pour the filling in
4) Freeze


A Slice of Papaya-Banana Pie


What a partially rehydrated dried fig looks like!

Read more...

Friday, February 21, 2014

Make-Believe Cheesecake | Of Love Letters and Ice Cream

10 comments

I made this for dessert on Valentine's Day in a moment of "This has to be cleared, pronto!". The expiry date was drawing near.

Make-Believe Cheesecake of Love Letters and Ice Cream

The tin of month-old love letters (kuih kapit) and container of vanilla ice cream had been sitting in my kitchen for sometime and no one seemed to be eating any of it. I was on the verge of giving it away but the more I looked at it, the more I thought of "cheesecake". Maybe it was just the magical-ness of Valentine's Day. So was born this idea.

As you can see, this is really easy to make. Two main ingredients : Love Letters and Vanilla Ice Cream. You'll need a small pie tin (about palm-sized) with a removable bottom.

Crush the love letters in a bag with a bit of soft butter. It doesn't have to be too fine. Compact this onto the bottom of the pie tin. Mash the ice cream in a separate bowl until it's soft enough (not melted) for you to work with. Spread this on top. Then, freeze for an hour or so until the ice cream is set. Serve with fruits on top.

Don't worry about the love letters not sticking together. Some of the ice cream will trickle through the gaps, solving that. It will only be a little crumbly but I like it that way - not aiming for a solid base. In case you're wondering, none of the ice cream leaked out of the pan. 

To remove, tap the bottom out of the tin. I wasn't as gentle but it slid out quite neatly! I was able to transfer it onto a plate without any trouble.

My only advice : Work quickly!


1) Love Letters
2) Crush Love Letters
3) Compact a thin layer of love letters onto a pie tin, fill with ice cream
4) Freeze

Voila! My masterpiece ~ served with oranges (canned ones).
What do you think? Does this pass for cheesecake?

Love Letters and Ice Cream, and a slice for me!

Note: I made the mistake of trying to smear frozen ice cream onto the crushed love letters straightaway. It was difficult to spread the ice cream about. The crushed bits of love letters stuck to the ice cream and was spreading along with each stroke of the spoon.

Hence, my decision to melt the ice cream a little by mashing it. That worked like a charm. Once I had one layer on, it was easy to spread the rest of the ice cream right to the top. 


Read more...

Monday, December 16, 2013

Emping Padi Baru (Rice Flakes)

12 comments

My recent trip to Melaka, a short getaway with the family, was fun and foodful. From chicken rice balls to durian cendol, we tried it all. The city is a favourite haunt for tourists. It is steeped in Dutch and Portuguese history, and has been listed in the UNESCO World Heritage site since 2008.

I stumbled across this snack while souvenir hunting at Medan Samudera, a small shopping complex that sells mainly Malaysian food products and many things that would make great mementos of Melaka. Ahem, I opened my wallet more than once!

Emping Padi Baru (Newly Harvested Rice Flakes)

Emping Padi Baru (newly harvested rice flakes) is a traditional local delicacy that is said to be more commonly found in the paddy growing northen states of Peninsular Malaysia. It is a treat that is rarely heard of these days, but not impossible to find. It is still sold in old markets up north and touristy cultural shopping complexes.

How this is made:
Freshly harvested rice (with husk) is rinsed and soaked overnight. Then, it is dry fried in a wok until it begins to snap. This is transferred into a traditional wooden mortar where it is pounded and flattened until the husk separates from the rice. Using a bamboo sieve, the husk (now light) is tossed out with several flipping motions, leaving the flattened rice behind.

Interesting?

Rice Flakes

There are several ways of enjoying this. This is what is written on the packet I purchased.

Instructions : Soak in hot water for a minute to soften. Mix with palm sugar and fresh grated coconut or eat with milk.

I paired mine with dessicated coconut and a drizzle of honey. It dawned on me that this snack could go a lot of ways ~ slices of fresh fruit, nuts, raisins and so forth.

Rice Flakes with Dessicated Coconut and Honey

Rice Flakes mixed with Dessicated Coconut and Honey

Another way of enjoying this is to dry fry it again, straight out of the packet. The rice flakes will be crunchy, much like biting into the crispiness of a potato chip. This is also eaten mixed with grated coconut and palm sugar.

For me, emping padi baru  would be great 'party food' because it is quick and simple to do. It isn't something I would eat in a large quantity so an appetiser or dessert would be how I would go about it.

Happy trying!
Read more...

Wednesday, November 6, 2013

Barley With Sweetened Condensed Milk

14 comments

Barley, the dessert!

Barley with Sweetened Condensed Milk

I've a couple of tricks up my sleeves when it comes to barley.  Unless I'm boiling barley water for someone under the weather, I prefer not sweetening it with the likes of candied winter melon or rock sugar while cooking. Plain is the way to go. This gives me a lot of leeway to flavour it however I please, be it sweet dessert or savoury treat.

I'm sharing an easy recipe today. This is probably the quickest dessert I've ever made (if you already have cooked barley on hand) and it's great eaten anytime of the day. Oh, let me put it this way - I call this an "up-to-you" recipe.

Ingredients
:

- Cooked barley with a bit of barley water (while still hot/warm)
- Sweetened condensed milk
- Lemon zest

Left: Barley grains (to be rinsed properly and soaked for an hour)
Right: Boiled tender - takes about 40minutes

How-to:

1) Scoop a few spoonfuls of cooked barley into a bowl or cup. Add some barley water.
2) Stir in sweetened condensed milk (to taste).
3) Serve with a pinch of lemon zest or chill in fridge, if you prefer having it cold.

Note: The portion, the thickness of the soup, warm or cold, the sweetness..it is entirely 'up to you'.


Barley with Sweetened Condensed Milk and a pinch of Lemon Zest

Yummy!

Read more...

Tuesday, October 8, 2013

Nagasari Jagung (Corn Kuih)

9 comments
I tried this recipe out the other day :  MiMi Bakery House: Kueh Jagung - Corn Cake. It's fabulously easy to make. Coconutty sweet and jelly-like.

Traditionally, it is made with banana but it can be modified easily using other ingredients like cendol (coconut milk jelly noodles) or jackfruit. In this recipe, sweet corn is used. 

Nagasari Jagung (Corn Kuih)
This kuih is typically wrapped in banana leaf but I didn't have any so I used a mould instead. I also substituted mung bean flour with corn flour.

My adventure in pictures:

1. Prepare moulds.
2. One can sweet corn, water drained.
3. Whisk corn flour (120g), sugar (150g), coconut milk(250ml) and water(750ml).
4. Cook on low heat. Stir continuously until it thickens. Add salt (
¼ tsp) and pandan leaf.


5. Oops, over-cooked it. Came out a lil uneven with lumps. So, I strained it.
6. Better consistency.
7. Drop corn into moulds. Pour mixture in. I did it in layers.
8. Chill in fridge for an hour plus or longer.


Slide Out From Jelly Mould

Nom Nom!

In Between

Read more...

Monday, April 1, 2013

Shepherd's Pie - Cream Corn Style

0 comments

Shepherd's Pie, also known as Cottage Pie, is probably one of the easiest pies to make. It's basically meat pie with a mashed potato crust on top. No flour based pastry required. Like! I know this isn't Facebook but I had to say it.

I was left with half a can of cream corn when I used half to make soup earlier. And I figured I should clear it off before it stays too long in the fridge. I have this habit of keeping too many things in there - waste not, being the motivation.

But I have been keeping track of my fridge hoarding activities! I contain it by making a conscious effort to include leftover cooking ingredients into the pot even though the recipe does not call for it. I've now come to realise that this is good practice and I don't need a bigger fridge after all.

Ingredients:
- 3 large potatoes (more or less, enough to cover the bowl/s, skinned)
- 1 tbsp salted butter
- 3 tbsp milk

- ½ can sweet corn cream style (425g can)
- 1 tbsp whole kernel corn (can)
- 200g minced beef
- 2 cloves garlic (chopped)
- 1 tbsp cooking cream
- 1 tbsp cooking oil
- Pinch of salt and pepper

How-to:
Corn Filling
1) Heat cooking oil in pan. Add chopped garlic. Give it a quick stir-fry.
2) Once you can smell the garlicky aroma, pour in sweet cream corn, cooking cream, whole kernel corn and minced beef.
3) Stir until meat is cooked. Don't let it dry out, add water if necessary.
4) Season with salt and pepper and you're done.

Mashed Potato Top
1) Boil potatoes until tender. Then, mash until fine.
2) Stir in butter and milk.

To assemble, pour the filling into a baking dish (not too high - leave some space for the topping). Lay the mash potato on top or pipe it on (I used an icing bag). Bake until lightly browned which took me about 30 minutes at 180c.

Minced meat and corn in cream

Potato piped on - Into the oven it goes!
 
Mmmm..mmm..yum!

Nom nom nom


Read more...

Tuesday, February 19, 2013

The Lunar New Year "Happiness" Drink

0 comments
I love Chinese New Year. It is a time which inspires us to cook with "auspicious meaning" in mind, usually involving food with similar sounding words that convey good wishes or messages.

For instance, the word Fatt Choy widely meaning 'prosperity wish' in Cantonese closely resembles the word Black Moss (also Fatt Choy) in the same language. For this reason, many Chinese include Fatt Choy into their New Year menu.

In our family, it is no different. On the first day of Chinese new Year, Tua Soh (eldest sister-in-law) prepares the "Happiness Drink" for our household. It is a sweet concoction of typical auspicious Chinese ingredients like the Pak Hup which is noted for unity, lotus seeds for fruitfulness, gingko nuts for wealth and so forth. The sweetness of the drink makes it a pleasant experience that keeps us happy. This is the message that it carries.

I share the recipe below, courtesy of Tua Soh. There are no quantifiable measurements for this recipe. You're free to follow your heart ~ the key is simply that it must be sweet and every cup served should contain at least one of each ingredient.

Happiness Drink

Ingredients:
- Dried Lotus Seeds
- Gingko Nuts
- Pak Hup (Dried Magnolia Petals)
- Honey Dates
- Dried Longans
- Dried Red Dates (Cut in half and seeded)
- Cane sugar (To taste)

How-to:
1. Boil dried lotus seeds, gingko nuts and pak hup together until tender. Then, drain away the water. We don't use this water because it is bitter. Leave aside.

2. Boil honey dates in sugared water, drain and leave aside.

3. To make the longan soup, boil dried longans with water (enough to serve the number of people required) for 3-4 minutes in a large pot. Add red dates and cane sugar. This will be the base of the drink because of the fragrant smell.

4. To serve, combine longan soup with ingredients from 1. and 2.

Pot of fragrant goodness

Yummy Honey Dates

I hope you enjoy this drink as much as I do.
Read more...
 

Sweet Home-Chefs Copyright © 2013-2017 Template Designed by BTDesigner · Powered by Blogger