AFC GRILLED : Chef Sean Connolly

An evening of good food.

Lap Cheong Watermelon Bites

An asian take on watermelon bites!

Baked Fish with Kiwi in Sweet and Sour Sauce

Add a twist to sweet and sour fish!

Semperit Pandan Cookies

Cute cookies for the festive season!

Monday, February 29, 2016

Blue Pea Flower Quinoa Salad

18 comments

We're mostly 'rice-and-dishes' people. This means having a plate of plain white rice along with various dishes of meat and vegetables, and sometimes soup. Salads make a rare appearance on our table.

Blue Pea Flower, Plum, Quinoa Salad

I made this to get an idea what blue pea flowers taste like. For a first try, I wanted to appreciate the flavour of the flower in it's freshest state. Frying it in batter or putting it in an omelette had to wait although I was really keen to have it that way.

Blue pea flowers, I'm delightfully surprised to discover, carry a mild, pleasant sort of sweetness. Pinch the lower bit of the flower away, eat only the petals. It was quite nice to munch on. Make sure the ones you're having are pesticide free, of course! I plant my own; no worries there.

Here's how I made this salad, roughly.

Blue Pea Flower Quinoa Salad

Ingredients:
- 8 fresh blue pea flowers (pinch lower tip away)
- ½ cup quinoa (cook according to instructions)
- 4 fresh plums (sliced)
- 1 tbsp balsamic vinegar
- 2 tsp soft brown sugar
- 1 calamansi lime
- 1 tsp sesame oil
- Salt (to taste)
- A handful of fresh coriander (chopped)

How-to:
1) Rub plums with sugar and balsamic vinegar. Roast in a pre-heated oven at 170C for about 15 minutes or until lightly charred.
2) Place cooked quinoa, roasted plums and fresh coriander into a bowl.
3) Squeeze calamansi lime juice over, along with sesame oil and a small sprinkle of salt.
4) Toss to combine.
5) Serve garnished with blue pea flowers on top.


1) Prepare the plums. Bake these first.
2) Cook the quinoa.
3) Chop the coriander and prepare the rest of the ingredients.
4) Assemble the salad!

This is a salad of robust flavours - from the peanutty taste of quinoa to vinegary plum. The blue pea flowers balances this out a bit. Best eaten with milder-tasting roasted meats.

Blue Pea Flower Quinoa Salad

That ends our edible flowers Link-Up event for Little Thumbs Up. We hope you enjoyed the edible flower series as much as we did! Thank you for joining us, be it by linking up, commenting or just dropping by our web page for a read.

~~~~~~~~~~~~~~~~~~~~~~~~~~~~~~~~~~~~~~~


This post is linked to Little Thumbs Up - Feb 2016 which is organised by Zoe from Bake for Happy Kids and Doreen from My Little Favourite DIY, and hosted by Sweet Home-Chefs.

Read more...

Thursday, February 25, 2016

Baked Egg with Zucchini Blossoms

12 comments
Zucchini blossoms? Hah! Plenty of resources on the web about these edible flowers. I had no trouble figuring out how to clean it and had as many tips how to eat it.

Some people remove the stamen/pistil in the center, some don't. I decided to leave it out of this egg dish. These flowers were purchased from Aeon, Desa Parkcity. I think my heart did a somersault when I saw it displayed on the shelf. I was that excited ..even if it wasn't in freshly-plucked condition.

".... It's not going to look any prettier once it's cooked." I put it in my shopping basket and made my way to the cashier.

Thus, begins another edible flowers adventure. I ate one of it raw to get an idea what it tastes like. I would describe it as something as refreshing as biting into cucumbers except that these aren't crunchy. It was light and pleasant. There is no bitterness or sourness to it, not even an aftertaste. It felt like I was munching on a thin soft lettuce.

My family loves egg dishes so it was only natural that I found inspiration from the many frittata recipes on the web. This is wholly oven-baked and I used what I had in the kitchen.

Baked Egg with Zucchini Blossoms

My husband gave it the thumbs up, especially raving about the bits of baked cream cheese. I loved it too! The cheese gave it a nice flavour. The flowers made it appetisingly pretty!

Baked Egg with Zucchini Blossoms
Ingredients:
- 6 eggs
- 7 zucchini blossoms (sliced)
- 1 medium-large red onion (thinly sliced)
- 2 medium tomatoes (sliced)
- ⅔ cup chopped celery
- ½ cup cream cheese
- 1 tbsp cooking oil
- Salt and white pepper to taste
- Flat-leaf parsley (optional)

How-to:

1) Pre-heat oven to 175C.
2) I used an 11-inch round baking tray. Grease tray with cooking oil.
3) Lay tomatoes, onion and celery onto the tray. Scoop bits of cream cheese over. Spread chopped zucchini blossoms around.
4) In a bowl, add the eggs and season with salt and pepper. Whisk the eggs to combine everything. Pour this egg mixture over the ingredients on the baking tray.
5) Bake for 25 minutes at 175C, or until cooked (baking time may vary).
Optional: Place a bit of flat-leaf parsley in the middle about 15 minutes into baking time.

Bits of Cream Cheese and chopped Zucchini Blossoms

The egg is poured in.

Getting the Bake!

Tadaa! Baked Egg with Zucchini Blossoms and Cream Cheese.

~~~~~~~~~~~~~~~~~~~~~~~~~~~~~~~~~~~~~~~


This post is linked to Little Thumbs Up - Feb 2016 which is organised by Zoe from Bake for Happy Kids and Doreen from My Little Favourite DIY, and hosted by Sweet Home-Chefs.


Read more...

Saturday, February 20, 2016

Pork Curry with Cucumber Flowers

26 comments

Fresh edible flowers are difficult to find. The city of Kuala Lumpur isn't always the most connected place for rarely consumed produce. I'd have a better chance at finding it if I were back in my kampung where many people planted their own fruits and vegetables.

Not many locals haven taken to eating flowers and I can guess why. Firstly, not many of us know which species can be eaten due to a lack of thorough information on the internet and anywhere else (I would appreciate it if someone could point me in the right direction!). Secondly, many of us are clueless as to which parts need to removed (if any) prior to popping it into the mouth. Thirdly, when the word 'edible' is used for flowers, does it mean that 'all' flowers can be eaten both raw and cooked?

When I stumbled across these female cucumber flowers (pictured last in this post) at Ben's Independent Grocer, Publika, I didn't hesitate to grab a couple of packs to try. I felt like an excitable young child. That is, until I got home and started googling for 'How to eat cucumber flowers' . I soon had one eyebrow lifted and was scratching my head at it all!

"Lord, help me. This newbie's gonna just do it like Nike!" Tossing my laptop aside, I decided that I was going to be the guinea pig, that one person who was going to take the tummy ache fall for this family. "Oh, don't be a sissy!" I lectured myself.

I rinsed a few cucumber flowers and ate the whole piece raw. Nothing happened and the rest, they say, is history.

It was a refreshing small burst of cucumbery flavour at first bite. Pleasant on the taste buds. Since I ate this as a whole with the mini cucumber attached, I can't say what the yellow flowers taste like on its own.

Curry goes well with freshly cut cool cucumbers on the side. I thought I'd use these flowers the same way. It tasted great together as I've now discovered!

Pork Curry with Cucumber Flowers

This is a sweet savoury rich curry that is best enjoyed with rice or bread.

Pork Curry with Cucumber Flowers

Ingredients:
- 300g pork ribs
- 20g cucumber blossoms (baby cucumber blooms) / about 20pcs (rinsed, trim the bottom edge)
- 1 or 2 stalks lemongrass (smashed)
- 2 medium tomatoes (roughly cut)
- 1 large yellow onion (roughly chopped)
- 4 cloves garlic (roughly chopped)
- 6 red chilli (deseeded and roughly chopped)
- A handful of fresh coriander (roughly chopped)
- 1 tbsp coriander powder
- 2 tbsp turmeric powder
(mix coriander powder and turmeric powder with a bit of water into a thick wet paste)
- ¼ cup cooking oil
- 1½ cup water
- 1 tbsp sugar
- ½ tsp salt (to taste)
- A dash or more of white pepper

How-to:
1) Blend tomatoes, onion, garlic, red chilli and fresh coriander together with 1-2 tbsp water.
2) Heat cooking oil in pan. Saute blended mixture for a minute or so.
3) Add coriander/turmeric paste and the smashed lemongrass into the pan. Stir-fry until the ingredients come together into a thick glossy paste.
4) Add the pork. Season with sugar and a dash of white pepper. Stir for a minute or so to coat the pork pieces with the sauce.
5) Add water. Leave to simmer until the pork is cooked. Stir until the liquid is dried out into a thick curry. Season with salt (to taste). Stir and taste. Switch the heat off once you're satisfied with the flavour.
6) Serve topped with fresh cucumber flowers.

1) The ingredients for the pork curry. 2) Blended onion, garlic, chilli, tomato, coriander mixture.
3) Saute the curry paste. 4) Add in the pork.
5) Simmer, and cook until dry!

This is what I call yum stuff.

Pork Curry

Top the curry with fresh baby cucumber blooms.

Cucumber Flowers

Isn't this a pretty curry!

~~~~~~~~~~~~~~~~~~~~~~~~~~~~~~~~~~~~~~~


This post is linked to Little Thumbs Up - Feb 2016 which is organised by Zoe from Bake for Happy Kids and Doreen from My Little Favourite DIY, and hosted by Sweet Home-Chefs.
Read more...

Tuesday, February 16, 2016

Chrysanthemum Tea Rice

21 comments

Dried chrysanthemums are fast becoming one of my favourite ingredients to have around the home. It adds a nice aroma to food, like this chrysanthemum tea rice I made the other day. Imagine a delicate fragrant version of cooked rice - that's how I would describe this.

Chrysanthemum Tea Rice

I was making a meat and vegetables curry for dinner one evening and it got me thinking about the kind of rice dish I could pair it with. Nasi kunyit (turmeric rice/yellow rice) came to mind, but I was itching for something milder that had less to do with the smell of strong herbs and spices. Since I had dried chrysanthemums on hand, it seemed only natural to try it out. That's how this came about.

The rice turned out really lovely, with a light inviting aroma of chrysanthemum.

If you're whipping up dinner for friends, this rice would add a little oomph to the whole meal. The best thing about it is that it's really easy to make! Do I hear hoorays?

Here's how I did it. The basics - instead of cooking rice with plain water, use chrysanthemum water!

Chrysanthemum Tea Rice

Ingredients:
- 2 rice cups white rice (rinsed)
- 2¼ cups cooled chrysanthemum tea (quantity will differ depending on rice type/follow rice cooker instructions) *
- ¼ cup golden raisins

*To make the chrysanthemum tea.
- Steep ½ cup dried chrysanthemums in 3 cups hot water (covered) for 10 minutes or so.
- Use a strainer to separate the water from the rehydrated chrysanthemums. Leave the water aside to cool. Use only what you need to cook the rice. 
Note: Don't waste the chrysanthemums. Reuse it (steep it in hot water again) to make drinks, a dessert or ...

How-to:

1) I use a nonstick electric rice cooker. Rinse white rice as you usually would with water. Drain the water away from the rice pot.
2) Pour in the cooled chrysanthemum tea. Cook as usual.
3) Once the rice is cooked, stir the raisins in and serve!

1) Dried Chrysanthemum Flowers. 2) Dried Chrysanthemums steeped in hot water.
3) Rinsed white rice. 4) Add cooled chrysanthemum tea.
5) A nice shade of yellow. Cook according to electric rice cooker instructions
as you would normally do with plain water..
6) Cooked chrysanthemum tea rice.

Stir the Raisins into the Cooked Chrysanthemum Tea Rice

Chrysanthemum Tea Rice - Serve!

Best eaten with whatever you fancy. But in my personal opinion, this is brilliant with meat satay and peanut sauce, good with herbal pork dishes with thick gravy and just alright with curry.

~~~~~~~~~~~~~~~~~~~~~~~~~~~~~~~~~~~~~~~


This post is linked to Little Thumbs Up - Feb 2016 which is organised by Zoe from Bake for Happy Kids and Doreen from My Little Favourite DIY, and hosted by Sweet Home-Chefs.

Read more...

Thursday, February 4, 2016

Steamed Red Anjou Pear In Chrysanthemum Tea

12 comments

Red Anjou pears are my recent obsession. Weeks ago, I used it in a foil-baked chicken recipe. I steamed the pears this time. Since I was tasked to work with chrysanthemums in a Little Thumbs Up event, I went with that to give my pear dessert a floral aroma.

Steamed Red Anjou Pear In Chrysanthemum Tea

The flavour turned out beautifully. It was smooth, with a well-rounded sweetness that made me wish I had added more liquid so that there was more to savour. But then again, more isn't always better! The sauce would have been diluted.

Steamed Red Anjou Pear In Chrysanthemum Tea

Ingredients:
- 2 tbsp dried Chrysanthemums (rinsed)
- 1 red Anjou pear (halved, seeds removed and sliced ¾ of the way as shown in the pics)
- 1 tbsp honey

How-to:

1) Steep dried Chrysanthemums in 1½ cup hot water for about 10 minutes)
2) Pre-heat steamer.
3) Place halved pear pieces onto a steaming plate.
4) Pour steeped Chrysanthemum tea through a fine-mesh strainer over the pears.
5) Drizzle honey over.
6) Steam for 15 minutes.

1) Dried Chrysanthemums being steeped in hot water.
2) Remove seeds from pear.
3) Place sliced pear onto a steaming plate. Pour Chrysanthemum tea and drizzle honey over.
4) Steam for 15 minutes.

Heavenly Steamed Red Anjou Pear In Chrysanthemum Tea

Enjoy!


With that, Happy Chinese New Year from all of us at Sweet Home-Chefs.
We wish you Gong Xi Fa Cai!

~~~~~~~~~~~~~~~~~~~~~~~~~~~~~~~~~~~~~~~


This post is linked to Little Thumbs Up - Feb 2016 which is organised by Zoe from Bake for Happy Kids and Doreen from My Little Favourite DIY, and hosted by Sweet Home-Chefs.

Read more...

Monday, February 1, 2016

Butterfly Pea Agar-Agar

18 comments

Butterfly Pea Flowers (clitoria ternatea) aka Blue Pea Flowers have long been used in South East Asian cuisine. The flowers are widely utilised as a colouring agent for rice in Nasi Kerabu and Pulut Tai Tai (a glutinous rice cake) in Malaysia. It is fried in batter in Thai and Burmese cooking. The petals are also eaten raw in salads.

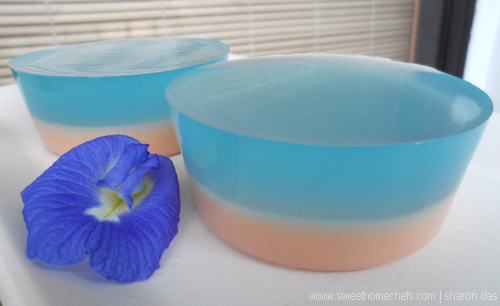
I decided to go with a beautiful agar-agar jelly for these freshly picked flowers.

Pretty Butterfly Pea Agar-Agar

These lovelies are really easy to make. The basics - use two packets of agar-agar powder (one brown, one clear). Cook according to packet instructions. Colour one using blue pea flowers. Cook the brown one with coconut milk. Voila! Present with fresh edible butterfly pea flowers.

Butterfly pea flowers are mildly sweet; I ate only the petals, pinching away the greens at the bottom.

Fifteen of these flowers gave me a light shade of blue - I was worried that it wouldn't stand out, but it did! The colour became more obvious after it firmed on top of the brown agar-agar. I was so pleased with the results. It was a pretty combination.

Here's the detailed recipe.

Butterfly Pea Agar-Agar


Brown Colour Portion
Ingredients:
- 10g brown agar-agar powder
- ½ cup soft brown sugar
- ½ cup coconut milk
- 3 cups water

How-to:
1) Mix agar-agar powder with brown sugar.
2) Add water into a deep pan.
3) Stir the mixed agar-agar mixture and coconut milk in, and switch the heat on.
4) Keep stirring until it comes to a low boil and don't stop stirring until the mixture is well combined (sugar dissolved). Then, switch the heat off.
5) Let it cool a little before pouring the agar-agar liquids into moulds, at half full each.
I used silicone cup moulds for some. It was very easy for me to remove the agar-agar here. The balance was poured into a square tin.
6) Then, leave aside to let it set whist you work on the next batch. (I left it to chill in the fridge as it wasn't steaming hot anymore.)

Blue Colour Portion

Ingredients:
- 10g plain/clear agar-agar powder
- ¾ cup fine white sugar
- 15 fresh butterfly pea flowers
- 4 cups water (follow packet instructions)

How-to:
1) Mix agar-agar powder with sugar.
2) Add water into a deep pan.
3) Stir in the mixed agar-agar mixture. Place the fresh flowers into the pan. Switch the heat on.
4) Keep stirring until it comes to a low boil and use your spatula to press on the flowers to extract the blue. Don't stop stirring until the mixture is well combined (sugar dissolved). Then, switch the heat off.


Finally, take the brown coconut agar-agar out from the fridge. It should have settled into a jelly-like texture by now. Optional: Use a fork and gently poke some holes on top, or grate the set agar-agar a little. This is to help the second layer stick to the first layer. 

Pour the butterfly pea colour portion over the brown one, thereby filling the mould. Chill until firm!

Top: Boiling the brown agar-agar powder with coconut milk and brown sugar
Middle: Boiling the clear agar-agar powder with sugar and butterfly pea flowers
Bottom: Leaving the agar-agar to set into a jelly-like texture

Butterfly Pea Agar-Agar

Butterfly Pea Agar-Agar Halved

Enjoy! My family gave it a big thumbs up!


~~~~~~~~~~~~~~~~~~~~~~~~~~~~~~

This post is linked to Little Thumbs Up - Feb 2016 which is organised by Zoe from Bake for Happy Kids and Doreen from My Little Favourite DIY, and hosted by Sweet Home-Chefs.
Read more...
 

Sweet Home-Chefs Copyright © 2013-2017 Template Designed by BTDesigner · Powered by Blogger