AFC GRILLED : Chef Sean Connolly

An evening of good food.

Lap Cheong Watermelon Bites

An asian take on watermelon bites!

Baked Fish with Kiwi in Sweet and Sour Sauce

Add a twist to sweet and sour fish!

Semperit Pandan Cookies

Cute cookies for the festive season!

Friday, May 30, 2014

Mini Pear Pork Patties

16 comments

What do you think of pear pork patties served on a bed of vegetables? A healthy balance? Juicy?

I found it quite a palate pleaser and look forward to making it again! These, made larger, would make a great patty for a burger too.  

Pear Pork Patties on Vegetables in Rice Wine

The meat patty is similar to the ones I made sometime back, which I paired with buns - Read: Pork Apple Burgers. How I chose to present this is an inspiration from Nigel Slater's pork meatballs with anchovies recipe.

I must tell you that these are really easy to do, a simple case of meat mixed with seasoning, shaped into flat patties and fried.

The pear gave the minced meat a nice flavour. It is further complimented with the strong sweetish taste from rice wine that comes from the vegetable sauce. Combined together in a dish, it all ties in deliciously.

If you're keen to try, here's how I did it.
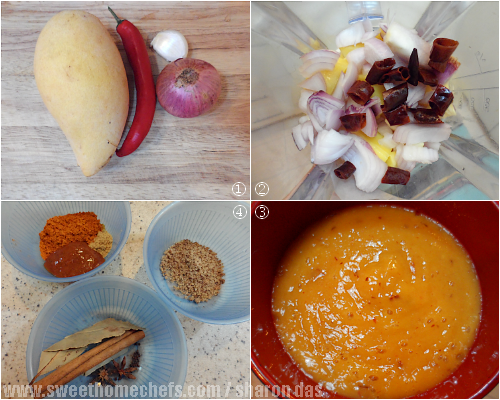
Ingredients:

Pork Patty
- 285g minced pork (chilled)
- 1 small-medium pear (grated)
- 2 stalk spring onion (chopped)
- Pinch of salt
- Dash of black pepper
- Sprinkle of chili flakes
- Cooking oil

Vegetables
- 3 to 4 Japanese Nai Pak (separate from main stem)
- 1 clove garlic (chopped)
- 1 tbsp oyster sauce
- ¼ cup rice wine
- ¼ cup water
- ½ tsp tapioca flour (diluted in 1 to 2 tbsp water)

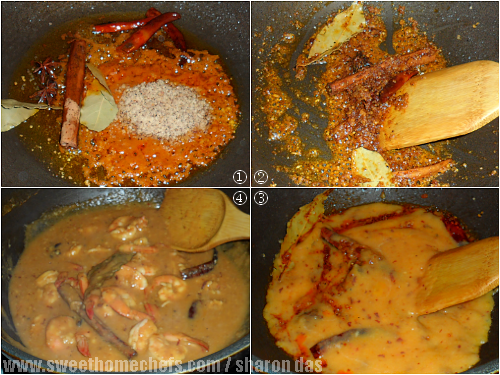
1) Mix minced meat with pear and seasoning
2) Pat meatballs into patties
3) Fry the meat patties
4) Cook the vegetables

How-to:

Make the pork patties
1) Combine chilled minced pork, pear, spring onion and seasoning (salt, black pepper, chili flakes) together in a bowl.

2) Roll into 10 small balls. Lightly flatten it.

3) Shallow fry in cooking oil until done (takes only minutes, turning once or twice)

4) Place on a paper towel to drain excess oil. Leave aside.

Note: It's easier to work with when the meat is chilled.
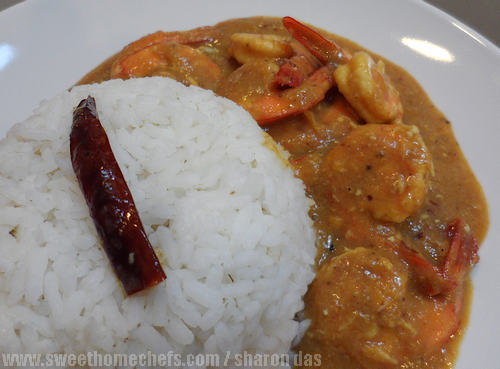
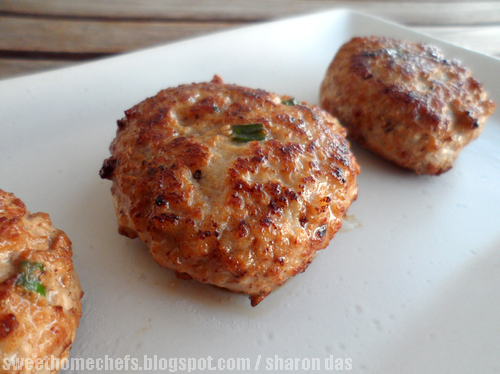


Pear Pork Patties

Cook the vegetables
1) Heat a little oil in the pan. Saute the garlic.

2) Add vegetables, water and oyster sauce. Stir to combine. Then, cook covered until vegetables are almost done. This should take only a little while.

3) Then, add rice wine. Switch the fire off. Stir in the tapioca flour to thicken the sauce.

To serve

Plate cooked vegetables. Place meat patties on top. Best eaten with rice.


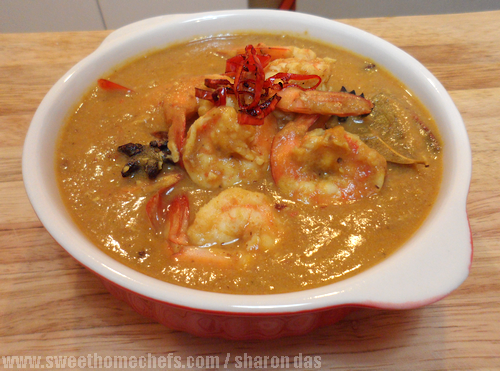
Pear Pork Patties That Didn't Go Into A Burger!

Read more...

Thursday, May 22, 2014

Preserved Duck Egg (Century Egg)

18 comments

The century egg is known by many names. Millennium egg, hundred-year egg  thousand-year egg comes to mind. The Thais, I think, have a good sense of humour. They call it  'horse urine egg', aptly describing the strong ammonia odour that surrounds it. How the century egg is made has nothing to do with horse urine, of course.

Personally, I don't find the odour as bad as it has been made out to be. Garlic breath proves more potent in the gagging factor.

How century eggs are made:

Wikipedia:
".....made by preserving duck, chicken or quail eggs in a mixture of clay, ash, salt, quicklime, and rice hulls for several weeks to several months, depending on the method of processing.


After a period of preservation, the egg white turns very dark brown, almost blackish. The texture is jelly-like and can be plain tasting or light salty. The yolk is a lump of rich fermented creaminess, usually a dull greyish colour.

Eating it:

No cooking required. It is usually eaten plain. It can be paired with pickled ginger. It is popularly added into porridge and Asian steamed egg dishes. It can be chopped up and sprinkled as topping for lightly flavoured braised or stir-fried greens. It works great as a topping on bland tofu too.

Removing the shell:

If you're buying century eggs without the dried clay mix around the egg, all you do is crack the shell and peel the skin off like you would a hard boiled egg.

I usually buy the ones with the dried clay still stuck on, as pictured below:

Century Eggs wrapped in a Clay Mix with Rice Hulls

Removing this clay can be a challenge. This one was too hard for me to break off.

Preserved Duck Egg - Century Egg

What I usually do is dunk it in a bowl of water for very a short time (30 seconds to under a minute).

Dunk century egg in water to loosen the dried clay

Then, nudge the clay mixture off. I work with disposable plastic gloves on. The clay will come off easily and in large pieces (as shown below). Rinse under water to clean off the remaining clay mixture.

At this point, you can choose to use a blunt serrated knife to scrape off the difficult parts, but I do this only if I want a completely clean shell. Otherwise, just crack the egg open and be done with it.


Nudge the clay mix off the century egg

This is what it looks like scraped clean.

A 'clean' century egg

Below are pictures to show you what it looks like inside. It is not unusual to see a pine or snowflake pattern on the egg.

1) Crack the shell open like how you would a hard boiled egg. I knock it in several places before peeling.

2) Rinse the egg before slicing.

3) It's very gooey in the center. Clean the knife before slicing again.

4) Now, it is ready to be served and eaten!

Preserved Duck Egg (Century Egg)


Read more...

Friday, May 16, 2014

Zucchini, Sunlady Melon Salad with Plum Dressing

16 comments

Should the ingredient 'cream cheese' be included into the name of this dish as well? Zucchini, Sunlady Melon Salad with Plum Dressing and Cream Cheese....phew! What a mouthful.

Zucchini, Sunlady Melon Salad with Plum Dressing

The initial plan was to whip up a quick healthy salad for dinner. As I gathered the necessary ingredients, I also seemed to be doing more than what had been visualised in mind. Before I knew it, I was baking stuff and toasting nuts. Huh.

Quick recipe? No. I'm being honest!

Healthy? I doubt, not with nugget-sized cream cheese bits in there that's just oozing with yumminess.

Things never go according to plan, does it? Especially when one has 'free reign' over the kitchen. I hold the whip here... and the spatula, the knives, the rolling pin.

Back to the salad. So, this is how it turned out in the end - six ingredients in the mix. Delicious? Yep! And refreshing to tuck into.

Ingredients:

- ½ medium-large green zucchini
- ½ medium-large yellow zucchini
(shaved with a peeler and sliced into half)

- 2 medium tomatoes (quartered)

- several shavings of Sunlady melon (use a peeler)

- ½ cup thinly sliced beef strips
(seasoned with salt and black pepper, baked on a greased pan)

- ½ cup cream cheese (cubed and baked on a greased pan)

- 1 tbsp pumpkin seeds (wok toasted)

Salad dressing:
- 2 tbsp plum sauce (bottled)
- 1 tbsp olive oil
- Pinch of salt
Mix the above together in a small bowl.


From Top-Left to Bottom:
1) Zucchini shavings going into the bowl
2) Throwing the tomatoes in
3) Shaving some Sunlady melon into the mix

From Top-Right to Bottom:
1) All the required ingredients ready to be put together
2) Plum sauce and olive oil
How-to:
1) Add zucchini shavings, melon shavings and tomatoes into a salad bowl.
2) Pour the plum dressing over.
3) Add beef strips and toasted pumpkin seeds. Toss lightly.
4) Serve with baked cream cheese nuggets on top.


Adding plum sauce mixture into the salad

Top with strips of beef and toasted pumpkin seeds

There you go - Zucchini, Sunlady Melon Salad with Plum Dressing!

Read more...

Monday, May 12, 2014

Self-Frosting Nutella Cupcakes

19 comments
I'm a fan of cupcakes with a bit of character. I define this as 'not being too perfectly flat on top'. Frosting makes cupcakes really adorable to look at but I'm more into streusels. A little crunch and crumble makes me beg for more.

I came across this recipe at CASA Veneracion, a cooking blog of sorts. The 'self-frosting' aspect intrigued me, so I gave it a go. It's a simple technique but one that I will treasure greatly. After all, when it comes to nutella, I think it's futile to resist.

I'm imagining several cupcake recipes I can try this out with. I'm not sure if it will work out the same way but I've got my fingers crossed for the best to happen.

Self-Frosting Nutella Cupcakes

How to do this topping:
After spooning cake batter into cupcake liners, drop a teaspoon of nutella on top. Take a toothpick, dip it to the bottom. Lift the batter up and fold across the nutella cream. I did this twice in a cross and swirled the top. The goal is not to stir nutella into the cake. It is to create a topping. Just work with the top.

The results: Amazing! The marbling effect turned out very well.

The cupcake top has a light yummy crunch to it. I'm embarrassed to say that I ate more than I should have. This cake recipe includes a little salt, which I thought was brilliant. The sweet nutella topping complimented the light salty-sugary taste of the cupcake tremendously. I describe the cake as not dense, not light, just right!

1) Batter should be smooth, but thick and still holds its shape.
This keeps the nutella from sinking.

2) Spoon batter into cupcake liners, drop a tsp of Nutella on top.
3) Do the fold and swirl.
4) Bake!

Here are a couple of photos to show you what it looks like inside:

The base is a lovely brown

Yummy center

These are fresh out of the oven.

Self-Frosting Nutella Cupcakes fresh out of the oven!

For the recipe, visit this link : Self-frosting Nutella cupcakes . I followed it to the dot!


Read more...

Tuesday, May 6, 2014

Soy Sauce Steamed Fish

16 comments

I gushed about steamed food the other day. This is one of my favourite ways of doing it - a simple steam that takes only minutes to prepare. You will have time to stir-fry another dish on the side while waiting for this to be done.

Notice that this recipe is quite alike the steamed egg dish I made the other day? I have flavoured this in a similar fashion, except that it has been made more exciting with rice wine and a flourish of garnish.

Steamed Fish

Ingredients:
- 1 medium Dory fish fillet
- 2 tsp light soy sauce
- 1 ½ tsp rice wine
- 1 tsp sesame oil

For the garnish:
- 1 stalk fresh coriander (roughly chopped)
- 1 chili (sliced)
- 1 large thumb-sized ginger (julienned)
- Cooking oil


1) Place fish onto steaming plate
2) Pour soy sauce mix over
3) Place into steamer (I use a wok)
4) Chili and ginger for garnish

How-to:
1) Mix light soy sauce, rice wine and sesame oil together in a bowl.

2) Place fish onto steaming plate. Pour sauce mixture from note 1) over fish.

3) Place into steamer and steam until cooked.

(I use a wok. Place a steaming rack stand into the wok. Place the steaming plate on top. Add water below and turn the heat up. Steam covered. Once the water comes to a boil, lower the heat and continue steaming until fish is cooked.)

4) Heat oil in pan. Fry chili and ginger until crisp but not burnt. Garnish steamed fish with crispy fried chili and ginger, and some fresh coriander.


Soy Sauce Steamed Fish

Yum!
Read more...

Saturday, May 3, 2014

Mango Prawn Curry

7 comments

I knew but I did it anyway. It was one almost-ripe Manila mango which had been sitting in the fruit basket for over a day. I lifted it up - large, smooth, cool on the skin. "How perfect! ", I thought to myself.

A little sniff told me it wasn't really ready but the more I looked at it, the more I was drawn to eat it. And that's how I ended up slicing a mango which had not reached its full potential, flavour-wise. That is also how this recipe came about.

I had already planned on cooking prawn curry for dinner. Adding blitzed mango into the mix seemed like a yummy thing to do. Ground hazelnut was thrown in for a little variety. It was also a case of 'why not?'. Soon, I started gathering more herbs, spices and so forth. The simple curry dish I had planned on making had become something a little more elaborate.

This is the result - a flavoursome curry with hints of prawn and mango sweetness.

MangoPrawn8
Mango Prawn Curry

Ingredients:
- 600g prawns (devein, remove shell but leave the tail on if you wish)
- 1 tbsp ground hazelnut
- 1 tsp brown sugar (or to taste)
- Pinch of salt
- 1 red chili (sliced thinly and fried crisp) for garnishing
- 3 tbsp cooking oil
- About 1/2 cup water

To Blend
- 1 mango (2/3 ripe, cubed)
- 1 medium onion (roughly chopped)
- 1 clove garlic (roughly chopped)
- 2 dried chili (rehydrated in hot water, chopped)

Curry Paste
Combine the following with just enough water to make it into a thick wet paste.
- 1 tbsp blended fresh red chili
- 1 tbsp curry powder
- 1 tsp coriander powder

Spices and Herbs

- 2 dried bay leaves
- 3 dried chili (rehydrated in hot water)
- 2 star anise
- 1 cinnamon stick
- 1/4 tsp mustard seeds


MangoPrawn3
1) Some ingredients - mango, chili, onion, garlic
2) Blend mango, chili (dried), onion and garlic
3) Blended mango
4) Spices, herbs, curry powder and ground hazelnut


How-to
:
1) Blend mango, onion, garlic and 2 pcs of dried chili together, with 1 to 2 tbsp water into a smooth paste.

2) Heat oil in pan. Add spices and herbs, curry paste and ground hazelnut. Fry until fragrant.

3) Pour in mango mixture from note 1) above. Add 1/2 cup water. Cook for about three minutes.

4) Season with brown sugar (to taste) and a pinch of salt. Add the prawns. Turn gently until all are coated in gravy. Let it sit until cooked, which should take less than a minute on medium-high heat. Stir before dishing out.

5) Garnish with slices of fried chili.

Note :
If using mangoes with a strong flavour, seasoning may not be required.

MangoPrawn4
1) Fry spices, herbs and curry paste
2) Fry until fragrant
3) Pour in mango puree
4) Finally, stir in the prawns

Best eaten with rice. If you're cooking this without the tails of the prawn attached, flatbread is a great alternative.

MangoPrawn5
Rice with Mango Prawn Curry

Mango Prawn Curry fresh out of the wok!

Read more...
 

Sweet Home-Chefs Copyright © 2013-2017 Template Designed by BTDesigner · Powered by Blogger