AFC GRILLED : Chef Sean Connolly

An evening of good food.

Lap Cheong Watermelon Bites

An asian take on watermelon bites!

Baked Fish with Kiwi in Sweet and Sour Sauce

Add a twist to sweet and sour fish!

Semperit Pandan Cookies

Cute cookies for the festive season!

Friday, June 28, 2013

Food Discovery : The Purple Burger

9 comments

Purple? ... Think beetroot and blueberry.

Cafe Taka : Purple Burger (with grilled teriyaki chicken)

Hah! Now, doesn't that look amazing?

It was a Groupon offer we couldn't resist! Being 'us', my girlfriend and I needed no prodding to purchase a coupon for a taste of Cafe Taka's purple burger. That's right, we're easily taken in by beautiful food and can you blame us? We have only ever eaten 'brown' buns.

Here's a look inside:

The purple burger gets halved!

The burger was divine. The purple bun was paired with grilled teriyaki chicken, cheese and greens. For me, at least, any meat doused in teriyaki sauce never fails the taste test. I'm easy to please.

With all that said, this has given me an idea how I want my baked bread to look like once I get down to learning the ropes of bread-making. You could say it's my next goal in the culinary world.

Read more...

Wednesday, June 26, 2013

Sweet Leaf (Sayur Manis)

4 comments
Sweet Leaf, a popular leaf vegetable in Malaysia and other Southeast Asian countries. We call it "Sayur Manis" or "Cekur Manis"  in Malay. To the local Chinese, it is known as"mani cai".

Sweet Leaf (Sayur Manis)

The great thing about this vegetable is that it is easy to grow in our climate, usually done via stem cuttings. It's a low maintenance plant that is trimmed regularly for it's leaves.

Cooking it
Only the leaves are used in cooking because the lower stemmed parts are hard to chew. It has a natural mild pleasant sweetish flavour. When cooking this, keep in mind that on its own, it doesn't require heavy seasoning. In Malaysia, it is typically stir-fried with egg or boiled in soups. It is also commonly served in Pan Mee , a local noodle soup dish usually sold by hawkers.

To remove the leaves from the stems, we place our thumb and index finger around the stem. Then, slide our fingers across. The leaves will come off as you slide. Rinse before cooking.

Eat the leaves, not the stem!

Where to buy
It can be found in most wet markets and supermarkets in Malaysia.

Storage
It doesn't keep long in the refrigerator. I clear it off within two days because the leaves begin to dry after that.

Check out: Sweet Leaf and Sweet Potatoes in Coconut Soup (Recipe)

Read more...

Tuesday, June 25, 2013

"Seasoning" That Wooden Cutting Board

8 comments
Wiping it clean before 'seasoning' with oil

There's nothing like using a wooden chopping board for cutting meat and vegetables. I like how it has 'character' - those shades of brown and crooked lines. It holds well and isn't slippery. Having a good grip on things when I'm doing some major chopping and slicing is important to me.

I also own a couple of white plastic cutting boards but don't feel the same exhilaration, and use it only to slice bread, cakes, fruit, the sort. This is just me.

When it comes to cutting boards, I believe it's always important to use what works for us because it makes us feel more confident with the knife.

A wooden cutting board requires some care. To keep it from cracking out of dryness and prevent it from mold, it is important to 'season' it with oil. Not just any oil though!

I learned from various articles on the net that regular cooking oil such as vegetable oils and olive oils are a no-no because it will turn rancid. Best to go for walnut oil or almond oil (if you're not allergic to nuts), or food grade coconut oil. Some recommend using food grade mineral oil with beeswax.

I'm more comfortable with something like coconut oil. So, that's what I'm going with.

There are various advice on how to oil a wooden cutting board. I like things simple so I go with rubbing oil all over the board with a clean cloth, waiting some hours and oiling it again. If I'm not satisfied with the results (say it looks too dry), I repeat the process. Then, I'm done.

However, if you prefer something more thorough, here are some articles you can read:

- How to care for a wooden cutting board | MNN - Mother Nature Network

- Cutting Boards - Chopping Blocks - Butcher Blocks | What's Cooking America


- How to Maintain a Wood Cutting Board: 5 Steps - wikiHow
Read more...

Monday, June 24, 2013

Sweet Leaf and Sweet Potatoes in Coconut Soup

2 comments
Sweet Leaf and Sweet Potatoes in Coconut Soup

I try to include greens on the menu daily. It's a habit that has been passed down from generations.

Gone are days when mom had to force us to "eat our vegetables!". I used to have a hard time swallowing it. More than once, I pretended to pile a hollow mountain of greens on my plate, fluffing it up to give the illusion that I was that obedient girl who had taken her share...more than.

Today, I chomp greens down wholeheartedly! I've often wondered why the experience was nightmarish before. Has this something to do with old age? Was it a case of 'mind over matter' or have I just lost my fussy side? Maybe.

I love Sweet Leaf (Sayur Manis) , a vegetable that isn't always available in the supermarket I regularly shop at. So, I get very excited when I do see it and I don't hesitate grabbing a bunch home.

Sweet Leaf

I made a coconut soup dish with the sweet leaf I purchased. Locals know this as "Masak Lemak"  style. Literally translated as "cooking fat" : Usually taken to mean that this dish will have a coconut milk based soup. It is usually eaten with rice.

But I was in the mood for something without rice, something soupy. So was born this lite version - less coconut milk in my recipe but just as yummy and delightful.

IF I'm having it with rice however, I would add in more coconut milk and make the gravy thicker. It gives the dish a richer taste, suitably complimenting bland carbs.

Ingredients:
- 2 handful sweet leaves (leaf only, remove stems)
- 2 cloves garlic (chopped)
- 1 medium onion (chopped)
- 1 medium tomato (cut into 6)
- 2 red chili (cut into squares)
- 1 sweet potato - fist-sized (cut into bite sizes)
- 2 tbsp dried shrimps
- 1 stalk lemongrass (hammered)
- ¼ cup coconut milk
- 3-4 cups water
- 1 tbsp cooking oil 
- Salt to taste

Make into paste (add a bit of water)
- 1 tsp ground coriander (ketumbar)
- 1 tsp turmeric powder
- ½ tsp shrimp paste (belacan)


The Ingredients


How-to:
1) Heat oil in pan. Fry garlic, onion and lemongrass together.

2) Once lightly browned or fragrant, add coriander/turmeric paste and stir quickly.

3) Add dried shrimps, red chilis and sweet potatoes, followed by water. Season with a little salt. Boil until sweet potatoes are cooked.

4) Then, stir in the sweet leaves. Lower the heat and add the coconut milk. Simmer (don't let the coconut curdle) a minute or so and taste.  Season with more salt if necessary.

5) Finally, add the tomatoes and serve.

Sweet simmering surprise

Sweet Leaf, Sweet Potato Soup

Read more...

Monday, June 10, 2013

Stuffed Squid with Rice in Lemony Tomato Sauce

3 comments
Stuffed Squid with Rice slathered in Lemony Sauce

I light up when I see fresh seafood in large sizes - big prawns, big squid, big crabs! It's like being in underwater wonderland. I don't buy it often but when I do, I get as excited and cheerful as Mr. Krabs when he sees a dollar.

With two large squids in my shopping bag the other day...

In me best pirate voice:"Arr...what shall I do with you, calamari beauty?"

I decided to make a one-dish wonder - stuffed squid covered in rich lemony tomato sauce. We eat rice almost on a daily basis. I'm used to cooking several side dishes to go along with it. So, I wouldn't consider this too much work. The only difference? It's all going to be served on one plate!

Check out the recipe below for my version of stuffed squid.

Stuffed Squid
Ingredients:
- 2 whole 8-inch squid (cleaned)
- 3 cups hot water
- 1 tsp cooking oil
- Fried Rice (Recipe below)
- Lemony Tomato Sauce (Recipe below)
- 2 toothpicks

How-to:
1) Plunge squid into hot water and remove quickly.
The goal is not to cook it. I do it so that there's less water seeping out from the squid when it's baking midway. It also makes it easier to stuff.

2) Stuff squid with fried rice.

3) Use toothpicks to pin the squid head back on. Make small cuts on top of the squid (shown in the photo below).

4) Place squid on a greased baking dish. Baste squid with cooking oil.

5) Bake uncovered in a pre-heated oven at 160c for 15 minutes more or less until the squid is cooked.

6) Pour lemon tomato sauce over baked squids before serving.


Stuffing Squid with Fried Rice

Make small cuts across the top and toothpick the head on

Once the squid is out of the oven, pour sauce over and serve

Stuffed Squid - A Meal For One

~~~~~~~~~~~~~~~~~~~~~~~~~~~~~~~~~~~~

Lemony Tomato Sauce

Lemon Tomato Sauce
Ingredients:
- 2 cloves garlic (chopped) 
- 1 large onion (chopped)
- 2 medium tomatoes (quartered)
- ¼ lemon (for juice and zest)
- ¼ water
- 1 tbsp sugar
- Pinch of salt
- 1 tsp cornflour (mix with water, into watery paste)
- 1 handful chopped fresh coriander
- 1 tbsp cooking oil

How-to:
1) Heat oil in pan. Add onions and garlic. Fry until lightly browned.
2) Add tomatoes, water and sugar. Scrape some lemon zest in, then squeeze lemon juice into the mix. Stir well and cook until tomatoes look smashed.
3) Season with a pinch of salt.
4) Turn the heat off and stir in the cornflour.
5) Add fresh coriander. Mix well.
6) Serve on top of baked stuffed squid.


Fried Rice with Button Mushrooms and Lemon Zest

Fried Rice
Ingredients:
- 1 cup cooked white rice (enough to stuff 3/4 of two squids)
- ¼ canned button mushrooms (out of 425g can)
- 1 handful thinly sliced beef strips
- 1 clove garlic (chopped)
- 1 red chili (chopped)
- Lemon zest
- ½ tsp dark soy sauce
- Pinch of salt and pepper (to taste)
- 1 stalk fresh coriander (chopped)
- 1 tbsp cooking oil
- A bit of water

How-to:
1) Heat oil in pan. Fry garlic until lightly browned.
2) Add mushrooms, chili and beef strips. Stir until beef strips are cooked. Add soy sauce and a bit of water (enough to help coat the rice brown). Then, add white rice.
3) Season with salt, pepper and lemon zest. Mix well.
4) Turn the heat off. Add fresh coriander and mix well.
5) Stuff this rice into the squid.

Read more...

Friday, June 7, 2013

Food Discovery : Finger Food - Labuan

2 comments

Labuan is a small island located just off the coast of Borneo. It is famous for cheap liquor and other general duty free goods.

For me, its key attraction has always been the finger food! That's what I look for the minute I touch down from the plane. The locals have a penchant for light snacks at teatime. You can find all sorts of cakes being sold around town. There are also stalls set up along the seaside for obvious reasons - no beach picnic is perfect without finger food!

A typical kuih (cake) stall - at a shoplot out of town:

Many varieties to choose from

I ordered a piece:

Apam Balik - A local made pancake with sweet corn and peanut filling

Below are photos of food I tried elsewhere... along Layang-Layangan Beach, to be exact.

These are banana and sweet potato fritters, a very common find. Sweetish fruit and vegetable deep-fried in savory batter is, after all, a match made in crispy heaven.

Banana and Sweet Potato Fritters

BBQ Chicken Wings is another local favourite. We usually drizzle calamansi lime juice over it and dip it in sweet chili soy sauce. There's an amazing mix of flavour in there - that bit of sour, sweet and spicy.

BBQ Chicken Wings

I also like dipping banana fritters into the same sweet chili soy sauce. It's something I picked up from Melaka folks. Try it, it's amazing.

Banana Fritter dipped in sweet chili soy sauce

Then, there's Satay. BBQ-ed meat on sticks, typically eaten dipped in a thick peanut sauce. It is usually accompanied with slices of fresh cucumber and onion. For something more filling, steamed rice cakes are usually ordered in addition.

Beef and Chicken Satay

Rice Cakes (Ketupat) and Peanut Sauce

That's the end of my feasting. I can only stomach so much in one afternoon!

To end this post, a photo of Layang-Layangan Beach...

Layang- Layangan Beach, Labuan


Read more...

Wednesday, June 5, 2013

Grey Oyster Mushroom

8 comments

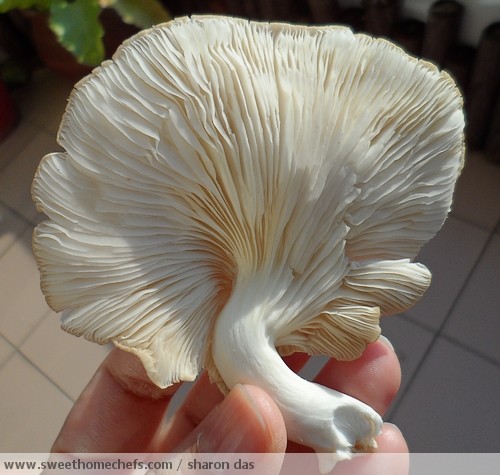
The beautiful folds remind me of a Chinese fan. It was hard to resist.....and I was a-l-o-n-e. I admit to picking one up and doing the little fan dance. Shhh..let this be a secret between you and me. Bah! This is the 'internet' I am confiding on.   

Grey Oyster Mushrooms are soft, velvety and cool on the fingers. I love the texture. It is easy to bite into and it has this lovely taste of mild sweet.

Grey Oyster Mushrooms
This mushroom is a versatile ingredient. Be it deep-fried, added into soups, braised or grilled, it tastes just as mmm..mmm..good. Personally, I find the stems a little chewy for soups and braised dishes so I tend to trim it off for later, usually to make stock. It is not always necessary to do this. I just like doing it because I'm biased towards the fluffy part - it is yummy!

It takes only minutes to cook oyster mushrooms. Ideally, add it in only at the last stage of cooking.

Storage: It stays good in a plastic bag for a week or so in the refrigerator. I've never kept it longer. I have however read that you can store it for up to two weeks wrapped in a moist napkin or towel, sealed in a paper bag.

Buying: If it's slimy, don't buy it. Choose plump ones.

Washing: Wash only before use. Swish it in water and that's all there is to it.

Beautiful, isn't it?

Velvety

Here's one way you can enjoy these mushrooms. I had this at a food truck in Johor.

The mushrooms are deep-fried and then sprinkled with a seasoning of salt, sugar and pepper ..at least, that's what I'm guessing is in the powdery substance. Whatever it is, yum stuff!

Deep-Fried Grey Oyster Mushrooms

Read more...

Monday, June 3, 2013

Braised Mushrooms With Snow Peas and Black Fungus

2 comments
Truth be told - I splash oyster sauce into most of my braised soy sauce dishes because I 'believe' it compliments the overall taste.

It's also a quick and easy way to add robust flavour into a simple dish of vegetables. A dash here and there into a hot wok of greens and it's ready to be served in minutes!

Below is a recipe for a simple dish I made the other day using mostly gooey sweetish oyster sauce.

Braised Mushrooms With Snow Peas and Black Fungus

Ingredients:
- 10 pcs dried Chinese mushrooms
(Soak in water for 1-2 hours until rehydrated, then remove stem. Rinse and change water once in between.)
- 10-15 pcs dried black fungus
(Small, soft variety - soak in water for 30mins until soft and spongy. Cut away hard parts. Rinse and soak in fresh water until ready to cook.)
- 20 pcs snow peas
- 1 clove garlic (chopped)
- 3 tbsp Oyster sauce
- Pinch of chicken stock granules
- 1 tsp cornflour (dilute in 1 tbsp water)
- 1 tbsp cooking oil
- A handful of fresh coriander for garnishing (roughly chopped)

How-to:
1) Heat oil in pan. Saute garlic until lightly browned.

2) Toss in the wet mushrooms and black fungus. While stirring, season with oyster sauce and chicken stock granules. Coat well with sauce and cook covered for 1-2 minutes. 

3) Add the snow peas in, stir until cooked.

3) Add cornflour into the mix. Give it a quick stir and serve garnished with fresh coriander.

Note: (
You can add a bit of water if you want more sauce.

I do not drain away excess water from the mushroom and black fungus before cooking. I usually toss them in wet, dripping with water. This water makes the sauce.)


Braised Mushrooms With Snow Peas and Black Fungus topped with Fresh Coriander

Read more...

Saturday, June 1, 2013

Mashed Pumpkin and Brinjal Tomato Curry

2 comments
Mashed Pumpkin and Brinjal Tomato Curry
 
This is something that came about when I had to leave on an impromptu trip. It was a family emergency.  After two weeks of playing nurse, I finally flew home.

The first thing I did was head for the refrigerator. There were fruits and vegetables just begging to be cleared! So, I had myself a cook fest. I cracked my knuckles, sifted through a ton of recipes and got down to thinking. Did I find anything in the cook books? ........ No.....but it was a good mental warm-up.

I decided on something mushy that would be heavenly for leftover bread. Mashing pumpkin and brinjal together in a tomato curry gravy seemed like a brilliant plan. Plan? That's not entirely true - both had to go into the pot pronto, or risk being demoted into the bin.

Anyway, it turned out so yummy that I was sad I didn't have more of it. It was sweet and saltish, mildly sour but rich in flavour from the many vegetable ingredients that were included.

This is how I did it. Enjoy!  

Ingredients:
- 2 medium round brinjal aka aubergine or eggplant (remove skin, julienne)
- 1 cup cut pumpkin pieces
- 2 medium tomatoes (cut into pieces)
- 1 large onion (chopped)
- 4 garlic cloves (chopped)
- 1 calamansi
- 1 red chili (sliced)
- 1tbsp blended chili
- 1 tbsp tomato puree
- 1 tsp curry powder, 1 tsp coriander powder, 1/2 tsp turmeric powder (add some water, mix into a wet paste)
- Pinch of belacan paste (shrimp paste)
- 2 star anise
- 4 cardamom pods
- 2 tbsp cooking oil
- About 1 cup water 
- Salt to taste

The Ingredients

How-to:
1) Heat oil in pan. Fry onion and garlic with star anise and cardamom pods.

2) Stir in curried paste and belacan. Fry quickly, add in tomato puree and chili.

3) Then, add in all the vegetable ingredients. Stir until well coated.

4) Add water (just enough to cook all the ingredients through). Squeeze in calamansi juice.

5) Season with salt and cook until all the ingredients are tender.

6) Using your spatula, mash lightly into a thick gravy.

Serve with bread or rice.

Smoking hot in the pot

Yum-Yum Mashed Pumpkin and Brinjal Tomato Curry
Read more...
 

Sweet Home-Chefs Copyright © 2013-2017 Template Designed by BTDesigner · Powered by Blogger