AFC GRILLED : Chef Sean Connolly

An evening of good food.

Lap Cheong Watermelon Bites

An asian take on watermelon bites!

Baked Fish with Kiwi in Sweet and Sour Sauce

Add a twist to sweet and sour fish!

Semperit Pandan Cookies

Cute cookies for the festive season!

Showing posts with label Steamed. Show all posts

Monday, October 19, 2015

Steamed Pork With Preserved Vegetables

10 comments

Chap Fan (mixed rice) aka economy rice is the kind of meal that we identify as having the familiar feel of home-cooked food. It is a makan (eat) stall that typically offers plain white rice along with many trays of meat and vegetable dishes to choose from. That it is affordable and a quick lunch option makes it a popular choice for many office workers. Me included, in the days I was still glued to a 9 to 5 job!

Steamed pork is pretty much a standard offering with Chinese economy rice sellers. It's easy to do and is generally a crowd-pleaser.

Steamed Pork With Preserved Vegetables

I attempted to make something similar, down to cutting it into squares. It is a flavourful dish with a little wine for that oomph and preserved vegetables for a rounded flavour.

Steamed Pork With Preserved Vegetables

Ingredients:
To mix
- 350g minced pork
- ¼ cup preserved salted / pickled mustard greens (rinse well)
- 1 medium onion (chopped)
- 2 stalks spring onion (chopped)
- 2 ½ tbsp chinese cooking wine (or rice wine)
- 1 tbsp corn flour
- Salt and white pepper to taste

Garnish
- 1 medium carrot (shaved with a peeler)
- Fresh coriander

1) Taste preserved vegetable to check on the level of saltiness. Place all the ingredients to be mixed, into a bowl. Season sparingly with salt (or leave it out) if you feel that the preserved vegetable is salty enough to flavour the entire mix. Add a couple of dashes of white pepper. Combine all the ingredients using your hands.

2) Arrange the pork mixture onto a 7 x 7in square baking tray lined with foil.

3) Steam in a pre-heated cooking pan until cooked, which took about 10 minutes for me.

4) Cut the steamed pork into squares.

5) Serve it on shavings of raw carrots. Pour pork juice over and garnish with fresh coriander.

Best eaten with plain rice along with a spicy soy sauce, bird's eye chilli condiment.

1) Gather the ingredients. 2) Combine the ingredients.
3) Place pork mixture into the steaming pan. 4) It's done after 10 minutes. Cut into squares.
5) Check out the pork juice!

Steamed Pork on a bed of Carrots, garnished with Coriander

Steamed Pork With Preserved Vegetables


Read more...

Monday, September 14, 2015

Steamed Lap Cheong Cakes

14 comments

Have you ever had a craving for something so strong that it creeps into your mind at every 'hungry' opportunity? I've been walking around with visions of me tucking into scrumptious steamed cakes laden with bits of Lap Cheong (Chinese Sausage). After weeks of torment, I finally decided to put the matter to rest!

I took to the kitchen, slamming cabinet doors along the way as I gathered the necessary ingredients. Soon, Steamed Lap Cheong Cakes were born. I held one warm luscious cake in hand. The first bite I took was so satisfying that I felt an overwhelming desire to give myself a big hug!

This is what it looks like fresh out of the steamer.

Steamed Lap Cheong Cakes

For the cake recipe, head on to Piggy's Cooking Journal at http://www.piggyscookingjournal.com/2007/09/steamed-cake.html .

These are the changes I made. I replaced olive oil with corn oil. Instead of sesame seeds or pine nuts, I added lap cheong that I had sliced into small bits. Quantity used: 1 regular tube of lap cheong (about 6in long) was sufficient. An inch out of it was kept aside and used as topping.

This recipe produces 6 regular cupcake-sized cakes, which is great because these are best eaten when it's fresh and warm. Although taste-wise it remains great the next day, the texture of the cake is less than satisfying even after re-heating.

Below is a photo of the batter, already mixed with lap cheong bits and spooned into the cake mould.

Filling The Cake Mould With Batter

I used a toothpick to test if the cakes were done. It was and took only 15 minutes in a pre-heated steamer.

After 15 Minutes Of Steaming

The cakes were soft, yet bouncy to the touch, much like babies' cheeks.

Allowing The Hot Cakes To Rest

A close-up shot I took whilst waiting for the cakes to cool a little.

A Close-Up Of A Rogue Lap Cheong Bit

As soon as I could, I eased one cake out and started eating. Before I knew it, I had finished two.

My thoughts ran along, "Gosh, this is yummy..."

T
Munching On A Warm Lap Cheong Cake

The verdict: Lap Cheong (Chinese Sausage) is one of the best ingredients I've ever added to a cake!

Read more...

Tuesday, May 6, 2014

Soy Sauce Steamed Fish

16 comments

I gushed about steamed food the other day. This is one of my favourite ways of doing it - a simple steam that takes only minutes to prepare. You will have time to stir-fry another dish on the side while waiting for this to be done.

Notice that this recipe is quite alike the steamed egg dish I made the other day? I have flavoured this in a similar fashion, except that it has been made more exciting with rice wine and a flourish of garnish.

Steamed Fish

Ingredients:
- 1 medium Dory fish fillet
- 2 tsp light soy sauce
- 1 ½ tsp rice wine
- 1 tsp sesame oil

For the garnish:
- 1 stalk fresh coriander (roughly chopped)
- 1 chili (sliced)
- 1 large thumb-sized ginger (julienned)
- Cooking oil


1) Place fish onto steaming plate
2) Pour soy sauce mix over
3) Place into steamer (I use a wok)
4) Chili and ginger for garnish

How-to:
1) Mix light soy sauce, rice wine and sesame oil together in a bowl.

2) Place fish onto steaming plate. Pour sauce mixture from note 1) over fish.

3) Place into steamer and steam until cooked.

(I use a wok. Place a steaming rack stand into the wok. Place the steaming plate on top. Add water below and turn the heat up. Steam covered. Once the water comes to a boil, lower the heat and continue steaming until fish is cooked.)

4) Heat oil in pan. Fry chili and ginger until crisp but not burnt. Garnish steamed fish with crispy fried chili and ginger, and some fresh coriander.


Soy Sauce Steamed Fish

Yum!
Read more...

Tuesday, April 29, 2014

Steamed Egg

10 comments

After eating all that yummy steamed food in Restoran Steam Fish & Steamboat, I was inspired to reproduce these favourites of mine. I started off with steamed egg. You will find this steamed egg dish in almost any establishment offering Chinese cuisine here.

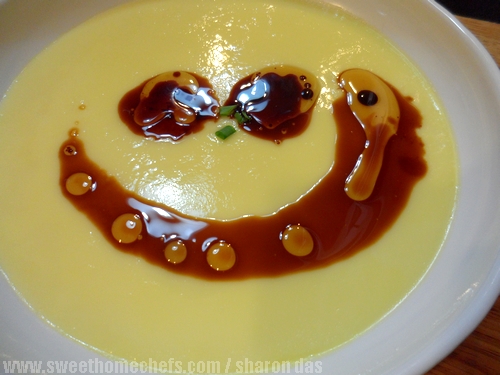
I've made this on several occasions  but had a little fun with it this time. If you have been following me on my other accounts in social media, you would have realised by now that I have a fixation for 'smileys'. I've tried not ending sentences with one but it always slips in somehow. And now, it's even on my food!

Anyway, I hope you like this version of steamed egg.

Ingredients:
- 3 medium eggs
- ⅔cup water

Seasoning (or to taste)

- 1 tbsp spring onions (sliced small)
- 1 tbsp sesame oil
- 2 tbsp light soy sauce

How-to:
1) Add 3 eggs into a bowl with 2/3 cup water. Mix with a fork or a pair of chopsticks (do not beat), until well combined.

2) Using a strainer, strain the mixture into a steaming plate (Aiming for a clear and bubble free mixture).

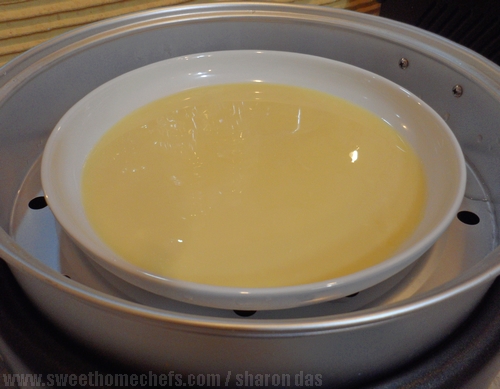
3) Cover the plate (using foil or another plate). Place this into the steamer and steam until the egg sets into a custard-like texture.

Note: I use an electrical cooker. Start on high heat. Once the water begins to boil, put the covered plate in and reduce the heat. It took me about half an hour to forty minutes on low heat but could be faster under different conditions. Give it a quick check on the twentieth minute if you're not sure or if this is your first time.

Egg2
Don't forget to cover the plate before steaming!

There you have it - steamed egg

4) Finally, mix sesame oil and soy sauce together. Pour this over the set egg. Sprinkle with chopped spring onions.

This is how it's done.

Egg1
Steamed Egg with Sesame Oil and Soy Sauce topped with Spring Onions

I am kidding, of course. Don't be stingy with the sauce or the spring onions. The picture above is a toned down version of what I really did!


Read more...
 

Sweet Home-Chefs Copyright © 2013-2017 Template Designed by BTDesigner · Powered by Blogger